Showing posts with label glitter. Show all posts

Saturday, September 22, 2012

Glitter Gradient

Hey guys! Sorry for not posting in awhile, college is keeping me busy and I haven't gotten around to editing/cropping mostly any pictures until now- even though I should be doing my homework. Yesterday was crazy, I planned on posting but after school I had to go to the doctor for my wrist- turns out I have tendonitis, and my mom made me get a flu shot, which stung like crazy, no other flu shot I've gotten has hurt that bad! And then we went out to try to find an outfit for our Fall Band Concert on the 30th, my first concert at Capital and I get to spend it being in the Symphonic Winds at Capital University- I'm so excited! And I got a 95% on my auditation test- which I was freaking out about because I thought I did poorly on it. woo! And then I got to spend from 7:30-11 helping my brother with his chemistry homework- not exactly how I planned on spending my night.

Now. Onto the nails!


Pictured is two coats of Zoya Caitlin (I think, possibly 3 coats) sponged with China Glaze Skyscraper. 
I really love glitter gradients. They're gorgeous, and just so simple to do. They're now my default way to wear glitter! haha


Thursday, September 13, 2012

Pink Glittered Framed Nails

I'm really digging the framed nails trend...and the fact that you can do it with glitter makes it so much more awesome! Especially since I tried it with just regular polish before.I could not get good lines around my nails, it was pathetic.

Pictured is two coats of Zoya Ali and gold glitter from bornprettystore.com 


Sunday, August 26, 2012

Pink and Girly Jelly Sandwich!

I'm back! I'm sorry that took SO much longer than I anticipated. I thought I'd be able to post these once I got back from orientation and before I went out of town for a day, but I was just too exhausted after walking around campus for 12 hours at orientation on Thursday, and Wednesday and Friday once I got back I decided to practice for my audition which was this evening, which didn't go too well, maybe it went better than I think it did? Who knows. I'll find out Tuesday. Long story short, I've been super busy with college and my best friend's mom's wedding that I haven't had a chance to post these!

Here I decided to FINALLY try a jelly sandwich! No, not a sandwich with some jelly on it, a jelly polish jam packed with layers of glitter in between! Awesome, right? Not too shabby for my first one :)


excuse the sad looking cuticles. I apologize :(

Colors Used
OPI You Callin Me A Lyre?
OPI Divine Swine
Sephora by OPI Only Gold For Me
China Glaze Fairy Dust

This kind of reminded me a little bit of OPI Teenage Dream, but not really. Having Fairy Dust on top made it holo looking in some lights and doesn't Teenage Dream have holo glitter in it? And just being pink and glittery and holo I automatically thought Teenage Dream. Maybe not super close, but more like a second cousin twice removed type deal haha

Monday, August 20, 2012

Blue and Silver Glitter Gradient

Good morning! How is everyone today? This morning I have my first try at a glitter gradient using the sponging technique to show you guys! Now I've done glitter gradients before, but always just by using the brush in the bottle and hoping that i don't add too much. Since I've started doing gradients in non glitter colors with the sponging method, I thought I'd give the sponging method a try- and I don't think it turned out too bad! MUCH better than how I was doing it before.

I'm really sorry that the non-flash photos are blurry, my camera saw the glitter and spazzed out I guess, because out of the 30ish photos I took, these were the best. Pathetic, right?


and for a flash one, just to show how sparkly it is! 


Colors Used:
Dots Atomic Blue
China Glaze Lorelei's Tiara

To do the gradient I cut a normal kitchen sponge into a tiny square and dipped it in some water, this helps prevent the sponge from just sucking up all the polish. Then I took the glitter and made a line on the edge of the sponge about the width of my nail and started dabbing my nail with it, starting at the tip and going down to create the gradient effect.

As for the Dots polish, I picked up two the other day when I went clothes shopping. I've only tried this one so far, but I'm pleased. It's a bright blue, brighter than all the other blues in my collection, but not quite neon. It dried a tad darker than in the bottle. But application was good, three coats and it was perfect. Plus they were cheap! Only $2.80 a bottle! And buy one get one half off too. 

Wednesday, August 15, 2012

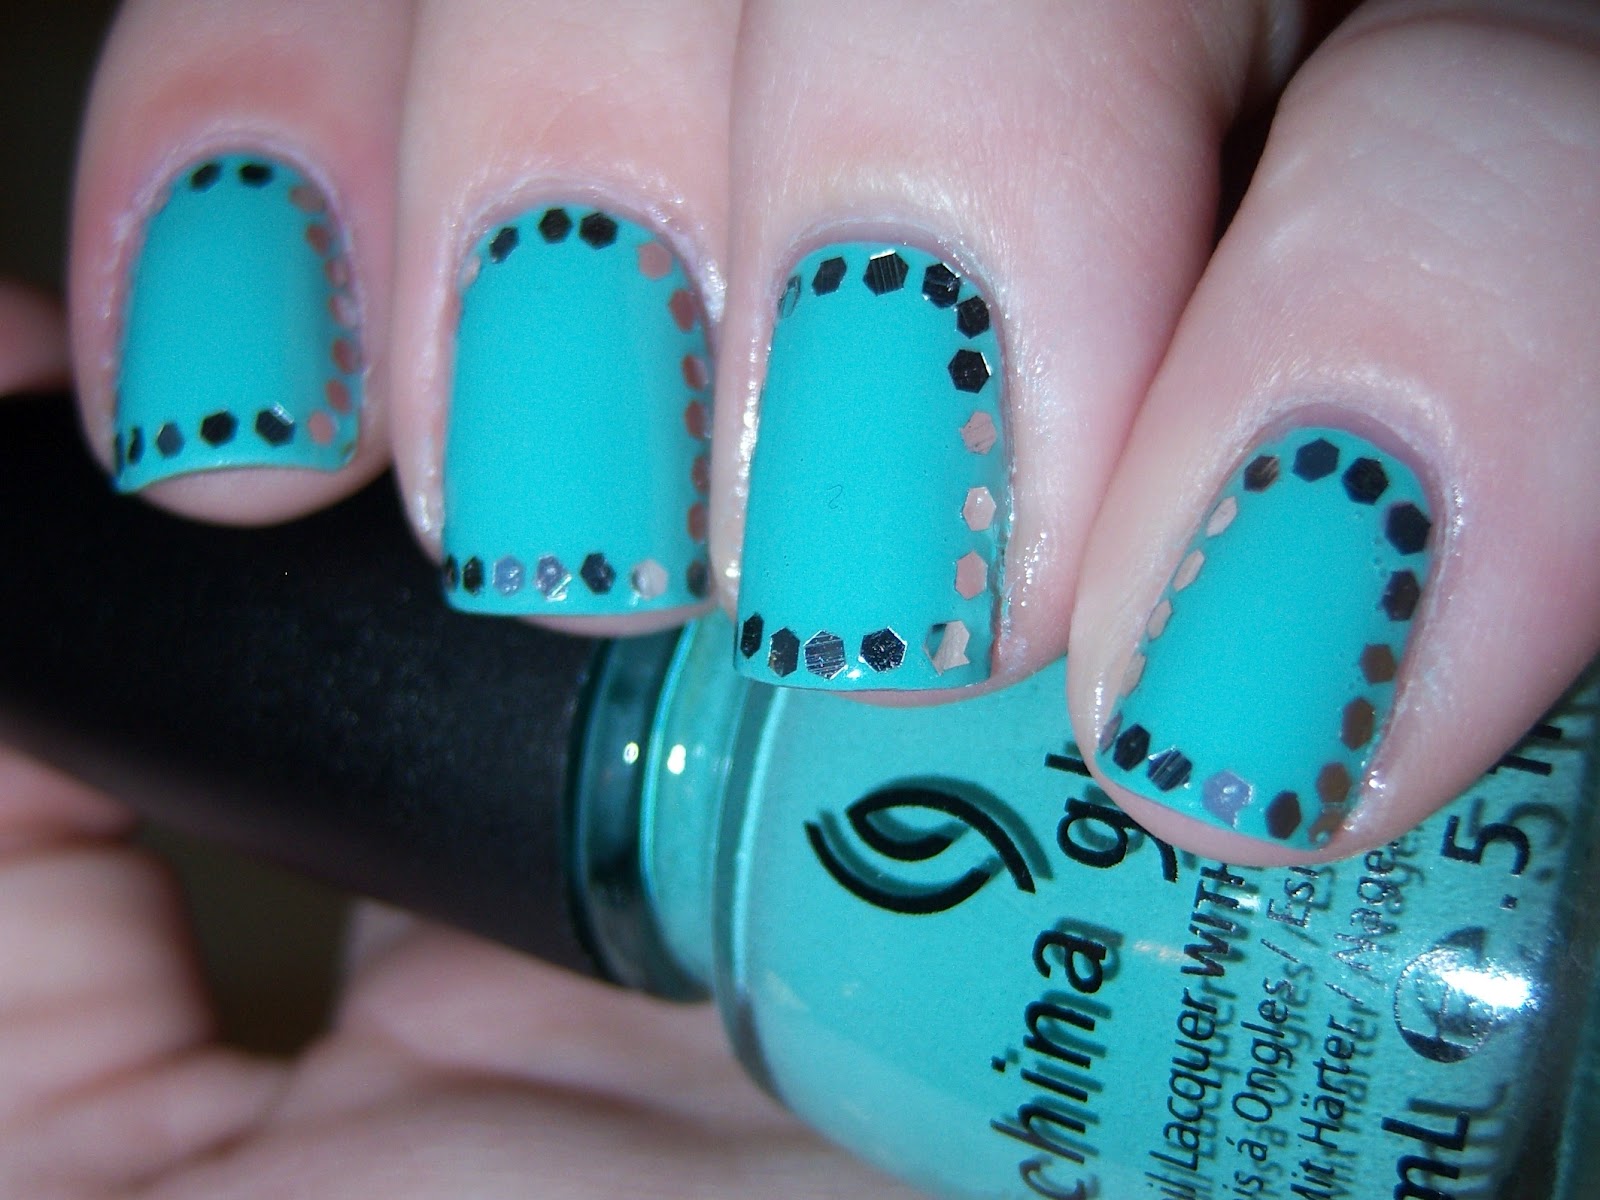
China Glaze For Audrey and Loose Glitters From bornprettystore.com

Hi guys! I decided to try out those loose glitters I got a few days ago for this. Inspired by thenailasaurus and the outline/border mani, I did this! 


Attaching the glitters wasn't that difficult, but it was a tad time consuming since they would stick to each other and then instead of picking up one glitter I'd be picking up five. Other than that application was easy and anyone can definitely do this. 

I absolutely love For Audrey. Isn't it just gorgeous? And application...flawless. Two coats. That's it. LOVE. Probably one of my favorite China Glazes ever. 

Sunday, August 12, 2012

OPI Pirouette My Whistle over OPI My Pointe Exactly


Pictured is one coat of OPI Pirouette My Whistle Over yesterday's nails, OPI My Pointe Exactly. I am absolutely in love with Pirouette My Whistle! I have a huge weakness for glitter polish and I don't have anything like this in my collection. It reminds me of China Glaze Techno, except it's not holo glitter! Despite not being holo, it's still sparkly and gorgeous, it just makes it great for when you want glitter, but don't want it to be "in your face" glitter. The larger pieces of hex glitter are more sparse than the fine pieces, which means if you don't want to have a nail with only 1 hex piece of glitter and others with a large amount of hex glitters, then you will want to just pay a little more attention to your application, unlike if you were applying China Glaze Fairy Dust. Aside from that, the application is wonderful. Unlike China Glaze Snow Globe, where it sinks into the polish a little bit, this just lays on top of the polish perfectly. It is lies smooth and flat.

Monday, August 6, 2012

China Glaze Kiwi Cool-Ada & Icing Love It

I wasn't even going to post this since I could not for the life of me get this to photograph and be color accurate, but I thought I would share my failure anyway. China Glaze Kiwi Cool-Ada is actually a neon, not this spring, grassy green that my pictures are showing. Icing Love It is a multicolor glitter that has purple, black, gold, and blue glitter mixed in (I think, I don't have my bottle with my right now but when I get back home I'll double check!). Application of Kiwi Cool-Ada was alright. Like most neons I have it was streaky on the first coat and evened out at around 3-4 coats. Pictured here is four coats of Kiwi Cool-Ada, one coat of Love It, and one coat of Seche Vite. You could probably get away with 3 coats of Kiwi Cool-Ada, but I did a fourth just to make sure I didn't miss any spots.


Neons are a pain to photograph. I took a picture of my neon shelf on my nail polish rack and they looked almost pastel! Crazy, right? I have a long way to go before I learn how to properly photograph neons.

Friday, August 3, 2012

NOTD: Essie Big Spender and Zoya Kissy

I actually only wore this for about 5 hours before I decided I didn't like it and changed it, but I thought I'd share it anyway, despite the poor lighting. I really tried to get a good picture but at 5pm the light from my window just doesn't cut it apparently. For the base color I used two coats of Essie Big Spender, and for the accent nail I added two coats of Zoya Kissy over two coats of Essie Big Spender. I topped it all with one coat of seche vite. I found out later that even though I thought I could get away with two coats of Big Spender, it was really a three coater, it was spotty and I really did not want to look at it any longer than I needed to. The combination is a nice one though.


Essie Big Spender has great application, you MIGHT be able to get away with two coats if you don't do thin coats and take your time with it, unlike what I did. I was at my grandparent's house and it was very dark where I was painting them, I don't recommend doing that, it looked great in the dark, but once the light hit it, the bare spots were revealed. Zoya Kissy is one of my favorite Zoya's. I recommend layering this polish over a similar base color, I've worn it by itself before and it's very spotty and sheer, so it requires at least three coats.


Wednesday, August 1, 2012

Icing After Party

Icing After Party is the colorful rainbow version of Icing Shredded, which is what I was originally looking for when I purchased this. It reminds me of OPI Rainbow Connection if it were thrown in a paper shredder and shredded into tiny bits. The brushes on Icing polishes reminds me a lot of China Glaze brushes, I'll include a picture of the brush, I like it, it's not too big but it's not too small, it's just right for me. The only downside of this polish for me is that my bottle has dried polish and glitter on the outside of it, which was there when i purchased it. I think that maybe it was with another bottle that broke and they just didn't bother to clean the bottle off, which is no big deal, but you can really see the dried polish on the bottom of the bottle. You would definitely want to wear a topcoat with this since some of the glitter bits don't lay flat against the nail and stick up a little bit, nothing a little Seche Vite can't solve though!


Pictured is one coat of Icing After Party over top of three coats of OPI Are We There Yet? 


Look at that glitter! So pretty

See the dried polish on the bottle?

A lot like China Glaze brushes, am I right?


Sunday, July 22, 2012

NOTD: Blue Gradient


I'm really into the Gradient trend lately. This is only my third attempt at it but hey, not too bad! I'm still trying to improve my technique though. 
The Base color is Essie's Borrowed and Blue followed by Essie's School of Hard Rocks and Bobbing For Baubles with an accent nail in Icing's Hey Sailor Boy. 

I could be wrong, but Hey Sailor Boy looks like a close dupe to Deborah Lippmann's Across The Universe. Don't take my word for it though since I don't own Across The Universe to compare it to. 

I'm not sure how I feel about these two looks together, but separately they're both fantastic colors! All three of the Essie polishes were pretty easy to work with, Borrowed and Blue took about three coats to be even and fully opaque, but if you take your time you could probably get away with two coats. Hey Sailor Boy also took three coats to be fully opaque. I'm not sure if my camera captured it or not, but it has green glitter in it as well as the blue glitter, very pretty!

Edit: I didn't notice the glare from my curtains until just now, please forgive me for the glare on my middle finger and my pinky!