Showing posts with label China Glaze. Show all posts

Saturday, September 22, 2012

Glitter Gradient

Hey guys! Sorry for not posting in awhile, college is keeping me busy and I haven't gotten around to editing/cropping mostly any pictures until now- even though I should be doing my homework. Yesterday was crazy, I planned on posting but after school I had to go to the doctor for my wrist- turns out I have tendonitis, and my mom made me get a flu shot, which stung like crazy, no other flu shot I've gotten has hurt that bad! And then we went out to try to find an outfit for our Fall Band Concert on the 30th, my first concert at Capital and I get to spend it being in the Symphonic Winds at Capital University- I'm so excited! And I got a 95% on my auditation test- which I was freaking out about because I thought I did poorly on it. woo! And then I got to spend from 7:30-11 helping my brother with his chemistry homework- not exactly how I planned on spending my night.

Now. Onto the nails!


Pictured is two coats of Zoya Caitlin (I think, possibly 3 coats) sponged with China Glaze Skyscraper. 
I really love glitter gradients. They're gorgeous, and just so simple to do. They're now my default way to wear glitter! haha


Wednesday, September 12, 2012

OPI Jade Is The New Black

OPI Jade is the New Black topped with China Glaze Fairy Dust

Most of you can probably tell, my pictures do Fairy Dust absolutely NO justice. It's so much more gorgeous in real life! 


Tuesday, September 4, 2012

China Glaze Rare & Radiant

Hi guys! How's everyone's days so far? I'm trying to build up my queue so that I won't (hopefully) be scrambling to post after a couple days of not posting- a week into college and I'm already SUPER busy.

Today I wanted to show you one of my newer polishes- China Glaze Rare & Radiant! I usually NEVER pay full price for China Glaze since I buy it online from head2toebeauty instead, and save a ton of money on it. But a few weeks ago when I went to Ulta I was so excited to see this that I didn't even pay attention to the fact that it was a China Glaze until a couple hours after I got home! I was hoping to find OPI's version of this, Just Spotted The Lizard, but there were no bottles left, oh well!


As you all probably know by now, Rare & Radiant is a dupe for Chanel Peridot. I love love love Peridot, I stopped using my bottle of Peridot as much because I didn't want to use it all up, so boy am I glad people have finally started making easy to find dupes! I was going to do a comparison post between the two, but there's so many out there already I decided not to- however if anyone wants to see a comparison post just let me know! 

Formula wise, it was great in 2 coats, but I'm a habitual three coater so I did three anyway. On a couple of my nails it did get a little bubble, but I'm not sure if it's because of the polish or me. Other than that, I give this an A++

What are your guy's thoughts? Are you excited to see Peridot dupes everywhere now or are you getting bored with seeing so many?

Monday, September 3, 2012

Studded Neon Half Moons

Good morning everyone! I hope everyone is having a fantastic Monday morning so far, I know I am! Sadly once I finish queing a few posts I'll have to start on my pile of homework, which I should have started already. Yay procrastination! And then once that's done, it'll be practice time! Yippe practice time! My first solo piece I get to work on in college with my AWESOME professor is the Weber Concertino . I am beyond excited about this! Now enough yapping, on to the polish!


I know this is blurry, but I feel like it portrays the true color of Pool Party the best, so I'm showing you all anyway. :) Actually, if I tilt my laptop screen more the top looks accurate too. So you know what, judge for yourselves, I guess it depends on your screen haha

For today's mani I started off with my new basecoat, Essie First Base Basecoat (watch out for an upcoming review!), two coats of Sally Hansen White On, and then a coat of Sally Hansen Insta-Dri Topcoat. Once that dried I placed reinforcement labels (those little circular ones to reinforce holes in paper) in the spots I wanted, and painted on three coats of China Glaze Pool Party, and attached some circular studs from bornprettystore.com to hide any imperfections in my half moons, and finished with another coat of topcoat. 

I really love neon with studs. It's summery, it's fun, but the studs just made it badass..in a girly neon kind of way. 

A little note about the studs: I used nail glue to apply them here. I DO NOT RECOMMEND THIS. The only reason I used nail glue was because of my previous experience with the little steel balls. However I used the studs on my nails a couple days ago for a different mani and used regular clear polish, and 2.5 days later, I've only lost one, and that was because I picked it off myself. Unless you do a lot with your hands, I think clear polish would work just fine. The nail glue was just a pain for me to remove since I only wore this a couple days.


Sunday, August 26, 2012

Pink and Girly Jelly Sandwich!

I'm back! I'm sorry that took SO much longer than I anticipated. I thought I'd be able to post these once I got back from orientation and before I went out of town for a day, but I was just too exhausted after walking around campus for 12 hours at orientation on Thursday, and Wednesday and Friday once I got back I decided to practice for my audition which was this evening, which didn't go too well, maybe it went better than I think it did? Who knows. I'll find out Tuesday. Long story short, I've been super busy with college and my best friend's mom's wedding that I haven't had a chance to post these!

Here I decided to FINALLY try a jelly sandwich! No, not a sandwich with some jelly on it, a jelly polish jam packed with layers of glitter in between! Awesome, right? Not too shabby for my first one :)


excuse the sad looking cuticles. I apologize :(

Colors Used
OPI You Callin Me A Lyre?
OPI Divine Swine
Sephora by OPI Only Gold For Me
China Glaze Fairy Dust

This kind of reminded me a little bit of OPI Teenage Dream, but not really. Having Fairy Dust on top made it holo looking in some lights and doesn't Teenage Dream have holo glitter in it? And just being pink and glittery and holo I automatically thought Teenage Dream. Maybe not super close, but more like a second cousin twice removed type deal haha

Saturday, August 18, 2012

Subtle Studs

Good morning! This morning I have something subtle to show you. It was late last night and I wanted to try out those square studs I got the other day. So I started placing them on, then realized I was way too tired and it was way too late to do as many as I had planned on each nail. But I think one on each nail like this is plenty! I love the red and gold together, kinda...dare I say sexy? haha. 


Pictured is three coats of China Glaze City Siren with Sally Hansen Insta Dri Anti-Chip Top Coat

To attach the studs I used my dotting tool to make a large dot of nail glue near the bottom of my nail, and then used the smaller end of my dotting tool to attach the stud. I have to say though, if you only plan on wearing it for a couple days, try using a clear coat or top coat instead of nail glue. I wore it for about 2.5 days and none of them fell off, and the glue was a little difficult to get off-it required lots and lots of acetone!

Wednesday, August 15, 2012

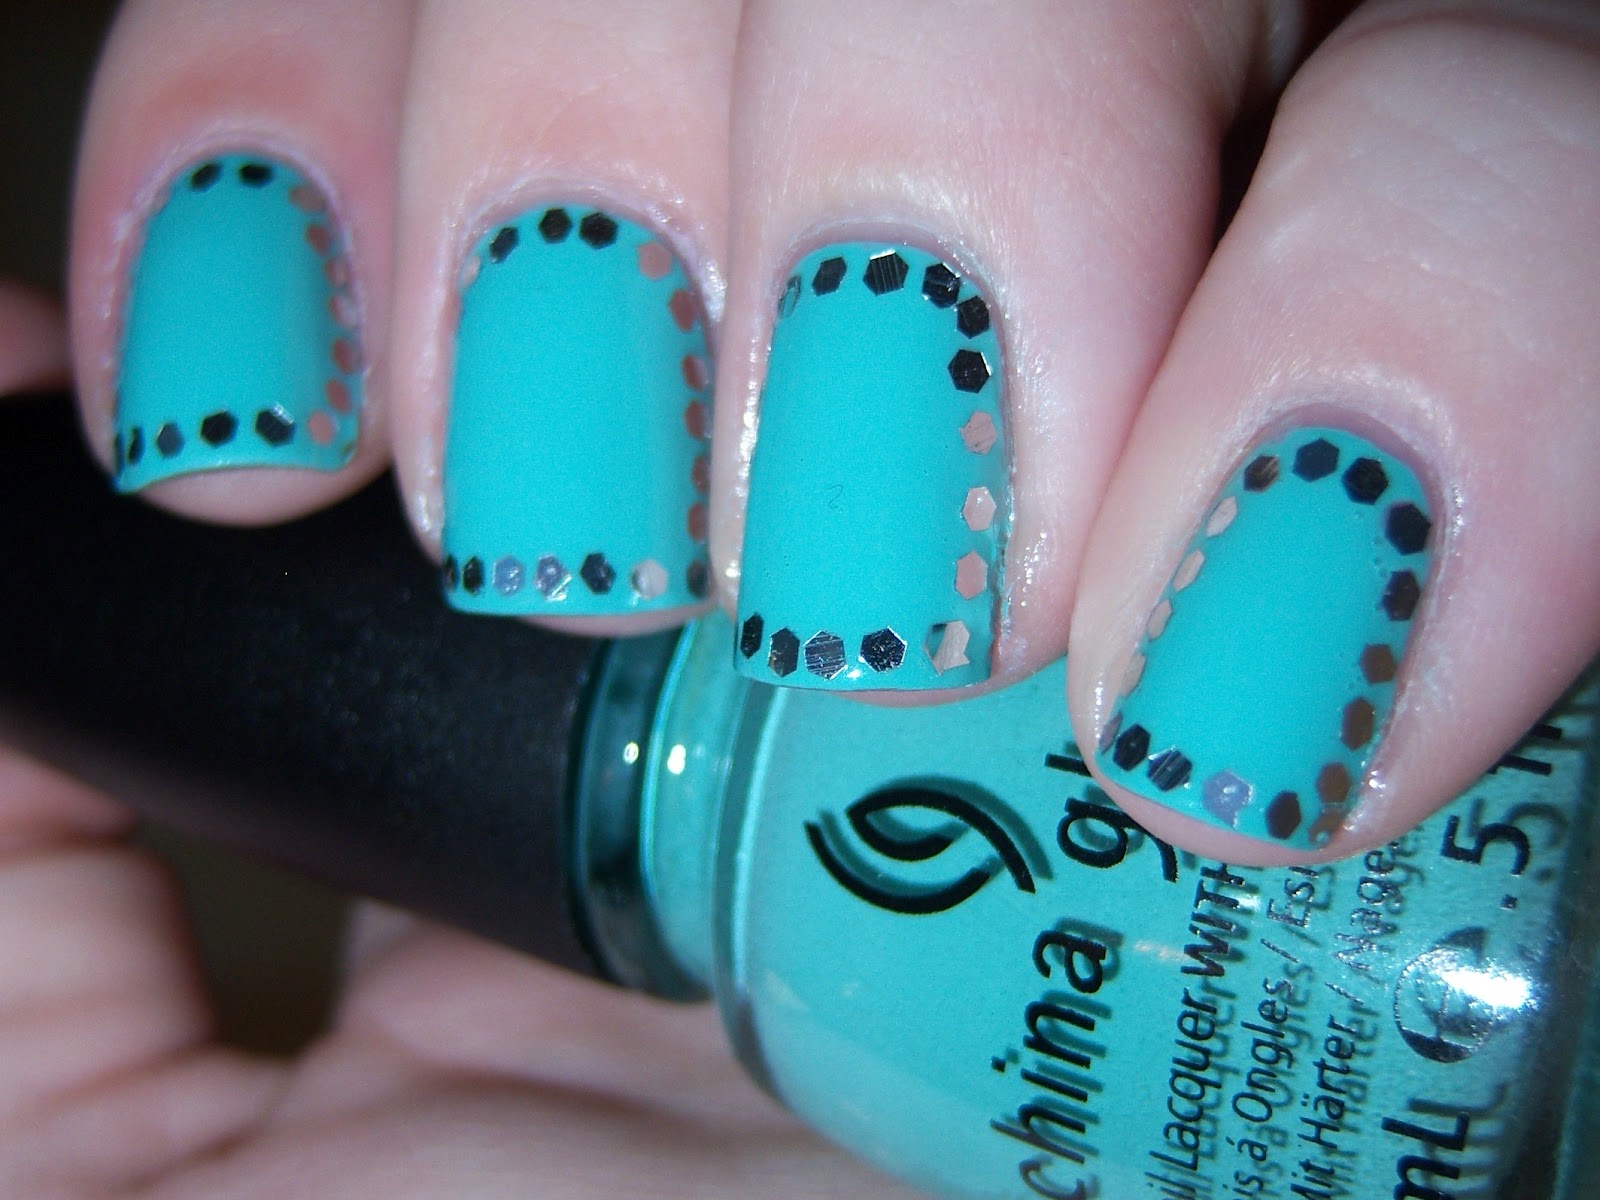
China Glaze For Audrey and Loose Glitters From bornprettystore.com

Hi guys! I decided to try out those loose glitters I got a few days ago for this. Inspired by thenailasaurus and the outline/border mani, I did this! 


Attaching the glitters wasn't that difficult, but it was a tad time consuming since they would stick to each other and then instead of picking up one glitter I'd be picking up five. Other than that application was easy and anyone can definitely do this. 

I absolutely love For Audrey. Isn't it just gorgeous? And application...flawless. Two coats. That's it. LOVE. Probably one of my favorite China Glazes ever. 

Tuesday, August 14, 2012

First Attempt at Using Nail Art Microbeads!

As you may have seen in my post from yesterday, I ordered some microbeads off of bornprettystore.com to try, and couldn't wait to try them! It took me about 4 tries to get this right. I tried it first with the technique of just using clear polish to hold the beads down and sealing with a topcoat. The first time I screwed it up when I put a topcoat on it. The second time I opted to not put a topcoat on, which was okay...for about an hour, then they started falling off at the slightest touch. So I put a topcoat on and screwed them up. The third attempt I tried with a different topcoat (OPI topcoat instead of my Seche Vite, which was really bubbly.) It got rid of the air bubbles, but I didn't wait long enough and ended up just dragging the beads off when I tried putting the topcoat on.

As you could probably guess, I got frustrated, my mom actually had to calm me down and look it up online about how to do it. After my little freak out session, we concluded that nail glue would probably be the best option for me. So the next day when I went out I stopped by Sally's and picked up some nail glue and tried it. And it worked! And I don't think it looked too bad either. Take a look! :)


For this I used three coats of China Glaze Urban Night and a coat of Seche Vite over all nails excluding the one with the beads. For that I just did three coats of Urban Night, applied nail glue, attached the beads, waited about a half hour, and applied a coat of OPI Topcoat. You could use Seche Vite over the beads, but mine has a ton of air bubbles in it so I only used it on the other nails. Top coat with a ton of air bubbles really shows through over the beads, even if it doesn't show that badly over regular polish. 

This actually lasted about 2.5 days before I started popping the beads off myself! I probably could have gotten another couple days of wear out of this if I hadn't of popped them off myself. The nail glue I used is the one pictured below, which worked well. Instead of applying small drops of it I put a big glob on and then spread it out with the large end of my dotting tool. I imagine using brush on glue would have been better, but I didn't think of that at the time. Oops!

The nail glue I used.

I used this end of my dotting tool to put the beads on. I dipped it in a little tiny bit of glue and wiped it off so that it was still tacky. You could also use a toothpick, but I imagine that'd be much more difficult.

And now, just to show my failed attempt, the first time I tried it, pre topcoat.


Do you see how much of a stringly, ugly mess that was? I used seche vite instead of a clear coat so that contributed to it being really really stringy since it dries so fast. So I definitely do NOT recommend using Seche Vite to try to apply them.

Also, like I talked about in a previous post, do you see how these microbeads aren't the same size? It's really noticeable in close up shots like this, but it's not that noticeable otherwise, unless you get the largest bead and the smallest bead next to each other. 


Monday, August 6, 2012

China Glaze Kiwi Cool-Ada & Icing Love It

I wasn't even going to post this since I could not for the life of me get this to photograph and be color accurate, but I thought I would share my failure anyway. China Glaze Kiwi Cool-Ada is actually a neon, not this spring, grassy green that my pictures are showing. Icing Love It is a multicolor glitter that has purple, black, gold, and blue glitter mixed in (I think, I don't have my bottle with my right now but when I get back home I'll double check!). Application of Kiwi Cool-Ada was alright. Like most neons I have it was streaky on the first coat and evened out at around 3-4 coats. Pictured here is four coats of Kiwi Cool-Ada, one coat of Love It, and one coat of Seche Vite. You could probably get away with 3 coats of Kiwi Cool-Ada, but I did a fourth just to make sure I didn't miss any spots.


Neons are a pain to photograph. I took a picture of my neon shelf on my nail polish rack and they looked almost pastel! Crazy, right? I have a long way to go before I learn how to properly photograph neons.

Saturday, August 4, 2012

China Glaze Trendsetter

China Glaze Trendsetter is from their Metro Collection from last fall. It's a mustard yellow with gold shimmer in it. In the lighting in my house it looks more like a darker olive shade than a mustard, but once I'm outside I can see how it's mustard. My mom actually described this as "an ugly pea baby food" color, which I have to agree with. It's ugly, but awesome. I've actually had this sitting on my nail rack for almost a year now because I wasn't that fond of it and thought it was ugly, but eventually it grew on me. It reminds me of those dogs that are so ugly yet somehow they're cute and you just want to play with all day. It's so ugly and unique, that it's awesome! See for yourself!


What do you guys think? Are you into these kinds of ugly, yet awesome colors? Is it something you'd wear?

Thursday, August 2, 2012

Quick Mini Haul!

Well, is it still considered a haul if they're rejects from your step mom? Probably not. I guess this is a "nail polish my step mom bought herself then realized she didn't like so she gave them to me" post. This actually happens a lot, she'll always buy some then find out she didn't like the color, it didn't look the same as the bottle, it didn't look good on her skin tone, etc. So here is what i acquired from her:


Left to right:
China Glaze Below Deck
China Glaze Admire
Nicole by OPI It Starts With Me
Orly Rock the World
Maybelline Express Finish Mod Mauve

All swatches were three coats, except for Below Deck, which was only two.


Do you see this uneven mess? This is the brush on the Nicole by OPI polish. This is my first Nicole by OPI and I have to say, I'm very disappointed in the quality of this brush, it's completely uneven, as you can see, and was just poor. It reminds me of the Sally Hansen Insta Dri brushes, except less even. I'm assuming this was just a defective brush, but since the packaging said "New Perfect Stroke Brush", I had higher expectations. It wasn't hard to work with at all since I'm used to larger brushes, but I think uneven brushes like this should never make it's way into a polish. I know if I'm spending a good amount of money on a nail polish, I want the brush to be just as good as the polish itself, not an uneven mess. Hopefully the polish quality is better than it's brush's quality. 

Other than that brush, they all seem very promising. I already had a bottle of Below Deck so I know for a fact that it is promising, but as for the others I'll do real swatches another day and see just how good they are, I'm thinking Rock The World may be a tad sheer, and Admire looks like it will show a lot of brush strokes, but I guess we'll have to wait and see!

Monday, July 30, 2012

Shatter...Experiment?

Hey guys! This is actually one of those "I wonder what this looks like if I do this" kind of experiment posts. I was about to take off the Polka dots I had done with Sally Hansen Lacey Lilac and China Glaze White on White when a thought popped into my head: What would shatter look like over polka dots? So I quickly threw on a coat of OPI Black Shatter over top of the nails from my previous post. I think the second picture really shows the polka dots more...take a look!


Now I'm sure someone somewhere has done this before, but I've never seen a picture of it so I thought I'd give it a go. I personally think that while you can't really see the polka dots all that well after putting the shatter over it, that it's kind of fun. More fun than plain old shatter over a solid color at least. Would I ever go through the trouble to put polka dots on my nails just so I could do this again? No. But if I had polka dots on previously and wanted a change but didn't have time to redo my nails, this is something I might consider doing. What do you guys think?

Sunday, July 29, 2012

Purple and White Polka Dots


Base Color- Sally Hansen Xtreme Wear Lacey Lilac
Dots- China Glaze White on White

Would you believe the purple stayed perfectly intact through moving, lifting, disassembling furniture, and ripping up carpet, trim, and carpet tack strips? Because it did. I painted my nails with Sally Hansen Xtreme Wear Lacey Lilac on Friday night, then the next morning for 4 hours I was cleaning out one of our bedrooms and ripping up carpet. Basically I was not going easy on my nails at all. And guess what! No chipping, whatsoever. So I decided to push my luck and see if I could get a couple more days of wear out of this before chipping begins. 

Over top of Lacey Lilac I used my dotting tools I purchased from Ebay to make polka dots using China Glaze White on White. Since I didn't want to have the tips shrink again by using more Seche Vite, I added a coat of Sally Hansen Xtreme Wear Invisible to it once the dots dried. 

Please excuse the dry cuticles, ripping that carpet up may not have hurt my nails or nail polish, but it sure did make my cuticles, and my hands overall, look and feel very dry. 

Friday, July 27, 2012

Yellow, Black, and Silver Stripes


Polishes Used
Sally Hansen Insta-Dri Lightening
Art Deco Black Sparkles
China Glaze Icicle 

Would you believe my brother picked out the colors and design? Inspired by a snake, he suggested I do yellow with silver and black stripes, he meant horizontal stripes but didn't specify that until I was already done with my left hand.

First I painted my nails with Sally Hansen Insta-Dri Lightening, I did three coats. Once that was pretty much dry I freehanded a silver stripe down the middle with China Glaze Icicle, and immediately after I used Art Deco Black Sparkles to do a black stripe down both sides of the silver stripe. Then I finished with a coat of Seche Vite after completing every nail to reduce the chance of the ends shrinking due to dry polish.

This is probably one of the easiest ways to do stripes, especially since your silver stripe doesn't have to be perfect since the black stripes along the sides will help to hide imperfections with your black stripe, perfect for beginners, or for people like myself who are impatient most of the time and want to do something different than plan polish but don't want to take the extra time most nail art designs take.

This actually reminds me of a design I did a couple months back where I used OPI Fly as the base and a white polish down the middle with black polka dots and a black stripe on each side of the white, I wish I photographed it though, it was one of my favorites, despite the staining from OPI Fly.